
But I’m sure you think they are super hard to make… on the contrary, they are fun and easy. And, they are a great activity to do with your child. As you spend time together on such a wonderfully creative activity, you are also imparting a meaningful message that beautiful toys can be made with our very own hands.

Stumps and flowers and little needle felted critters add woodland magic to Teddy’s playscape.

Onto the tutorial…
To make the green base for these sweet felted landscapes all you’ll is need:
* White wool
* a bamboo place mat (or bubble wrap)
* dish detergent
* two packets of green Kool-Aid (or about two tablespoons of green food coloring)
To begin, lay your bamboo place mat down on a flat surface.
Break off hand length pieces of your white wool, about an inch thick.

Place these lengths of white wool on the bamboo mat… two pieces this way… then two pieces on top of the first, the other way, at right angles.

Continue building two this way and two that way until you have placed about 4 layers on top of each other.

Now, roll the mat up with the wool inside.
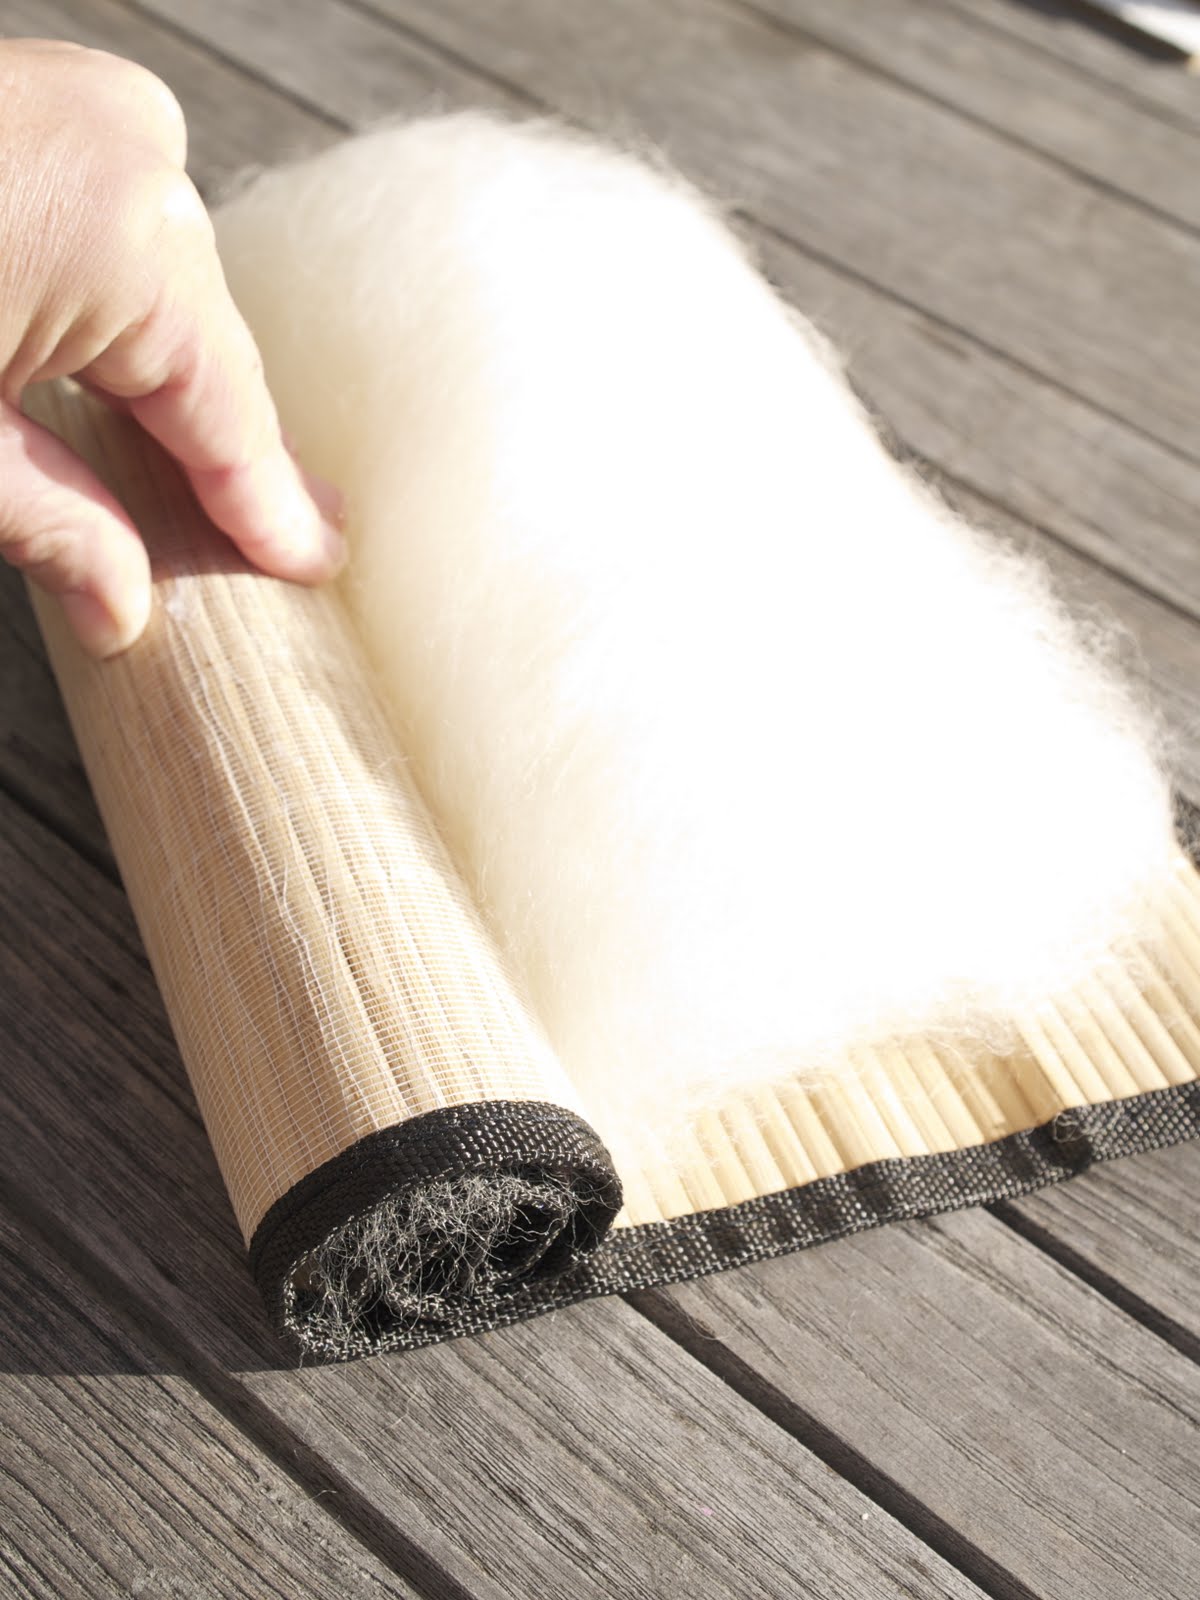
The wool will all be rolled up inside the mat… don’t worry if some is sticking out of the ends.

Pour a little detergent into the middle of the roll.

Pour some warm water into the middle of the roll.

You (or your child) can now roll the mat back and forth on a flat surface.

Soon it’ll foam up wonderfully.

Use a little elbow grease, rolling it for about 5 to 10 minutes. Take turns with your child and when you think it is nicely felted inside the mat, let your child unroll it to reveal your wonderfully felted FLAT piece of wool.

This is Teddy’s favorite part of the process… massage the felted wool with your hands so that it felts just a little more. He loves this as the wool is warm and soapy and all wonderfully squishy.

Rinse out all of the soap from your lovely flat piece of felt.
Now for the dying process. We use Kool-Aid… it makes your white felt such a wonderful meadow green (food coloring should work just as well)

Empty two packets of green Kool-Aid into a rectangular baking dish.

Teddy loves this part too :-) The Kool-Aide makes volcanos!

Make sure you child is a safe distance away when you pour boiling water in to the Kool-Aid… enough water in which to submerge your wool.

Now, add your white wool felt. Use a spoon to make it sink under the green water.

Leave your wool in the green water and watch your child marvel as the wool sucks up all of the green and turns the water back to clear!

With cold water, rinse your green felt, roll it up in a towel and get your child to stomp on it to dry it. Pop it in the dryer for a few minutes for the final felting and Voila!

You have a beautiful green meadow base for your playscape.
Now, needle felt the trimmings onto the meadow and you and your child will delight in the enchanting playscape you have made together.
Here is my recent tutorial on how to needle felt little toadstools… once you have the toadstool down, the other embellishments will follow easily.
I have listed a few playscape kits in my shop just in case you feel brave enough to give these a go… the kits include all the wool you’ll need (white for the base and colored for the embellishments), bamboo place mats for the wet felting, two packets of green Kool-Aid, two needle felting needles and a protective foam board. Really, you and your child will have a ball making your own versions of these wonderlands.
Happy creating,
Blessings and magic,
Donni
p.s. – I’m sorry of the random spaces in my posts… is anyone else also having trouble with the new Blogger uploads?


15 Responses
Thanks for the lovely tutorial.
Yes I had some issues the other day with blogger and centering text/ images :(
What a lovely thing to do with your child! The playscapes are super cute.
It’s beautiful! I SO have to get my hands on some wool to felt like that! I’ve never tried it only because they don’t sell these supplies in stores around where I live. I’ll have to order online so I can try it. Thanks for sharing :)
I LOVE this tutorial! Thank you! I’ve never seen this particular way of making them- with the mat and kool-aid. SO fun! Can’t wait to make one!
Thanks again.
Becca
Donni, Thanks for unlocking some of the secrets of felting here. I especially found the mushroom tutorial that this post is linked to helpful. Felting has always looked so intimidating, but I think now that I might just have to try.: )
I love this so much I have just ordered myself some needles, first time I have opened my eyes and actually seen how this is done, thankyou so much for the tutorial, Im so excited to get started. You spread such wonderful life enhancing information on how to enjoy life with our kiddies, I love your friday nature table, always something fun to do on the weekend after I have visited you.
thankyou so much, about time I participated really!
xxx
sheree
I know, those spaces are annoying.
If you click on the edit html tab when you compose your post, you can see where the extra spaces are even if you don’t understand the html. then you can delete them.
hope this helps
I am saving up your ideas for the foggy future when I have grands!
Sandy in the UK
I love your playscapes, so pretty!
Oh Yes… thank you Sandy… that worked. You are a star,
Blessings and magic,
Donni
Thanks so much for sharing this. I love the little landscapes.
I can’t wait to make one! Now if only I can find green kool aid, I didn’t know it came in green!
So beautiful, as always. Thank you.
I just “found” your blog on the internet, I’m a teacher in a Waldorf-kindergarten in Europe and we suffer from the economic depression, that keeps many families from sending their children to our groups.
I have no time now to take a closer look, but it already comforts me to see that there are people sharing our ideas even if it is on the other side of the globe.
Thank you.
Thanks so much for this tutorial!! Now I don’t have to wait to find a green wool sweater at the thrift store!
I never thought to wet felt with a bamboo placemat! We will definitely be trying this!
Blogger either messes up my spacing or my pictures load funky and blurry…I can’t win! :(