Can you believe that there are only 32 days until Christmas? I can’t! This year has flown by so fast I feel I have hardly had time to catch my breath… let alone get ready for the next!
We are very excited to start preparing for our handmade christmas and will be posting many Christmas crafts, activities and decorations.
Here is our first handmade Christmas Tree decoration… isn’t it lovely!
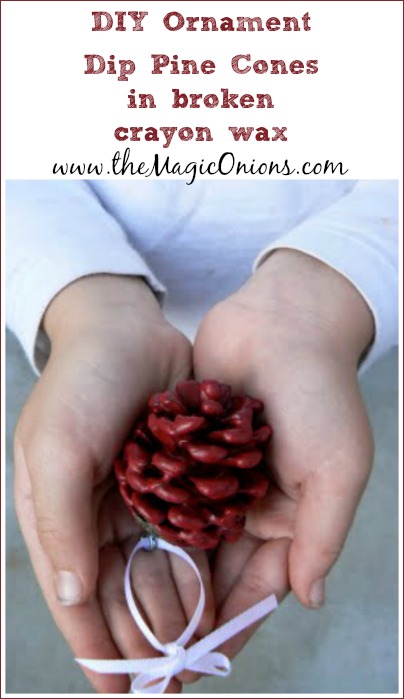
These pretty pine cone decorations are made by dipping pine cones into melted wax. They are lovely handmade Christmas decorations using natural materials that you can find anywhere. You can use beeswax which gives off a lovely warm honey aroma but we chose to use colorful wax instead. Besides… my Mr T is a crayon-breaker extraordinaire and we have bucket loads of broken crayons just waiting to be upcycled.
To make our pine cone tree decorations, we needed…
my new drill (isn’t it gorgeous?!)
eye screws
broken crayons
cups
pine cones
glass jars

Start by drilling a hole in the bottom of the pine cone with a drill bit that is the size of your eye screws.


Screw the eye screws into the holes.


This is a great activity for a 5 year old. After a lot of hand/eye coordination and concentration, she felt a great sense of achievement when her task was complete.


Now is the time sorting the broken crayons into colors. K is very good at this and even Mr T got the hang of it. We chose blue, green and red for our wax pine cones.
 Mr T was especially good at peeling the paper off the crayons.
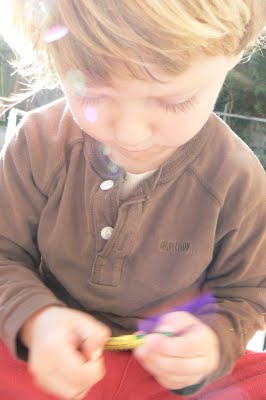
 Mr T was especially good at peeling the paper off the crayons.
And then breaking them up into their respective cups.


Crayons sorted, time for melting them…


Transfer each color into a glass jar. Pop the jar, one at at time, into the microwave. Heat on high for 2 minute increments, stirring every 2 minutes, until the wax crayons have melted. Ours took about 5 minutes to melt. Please be careful… the melted wax and the glass jars are very hot… I used my oven gloves to handle the jars.


Holding it by the eye screw, dip your pine cone into the melted wax. Depending on how thick your wax is, you may need to let your pine cone cool for 30 seconds and then dip it again for a thicker coat of color.


Place each colorful pine cone on wax paper to cool.


Cut a length of ribbon for hanging and your lovely pine cone decorations are ready for display.
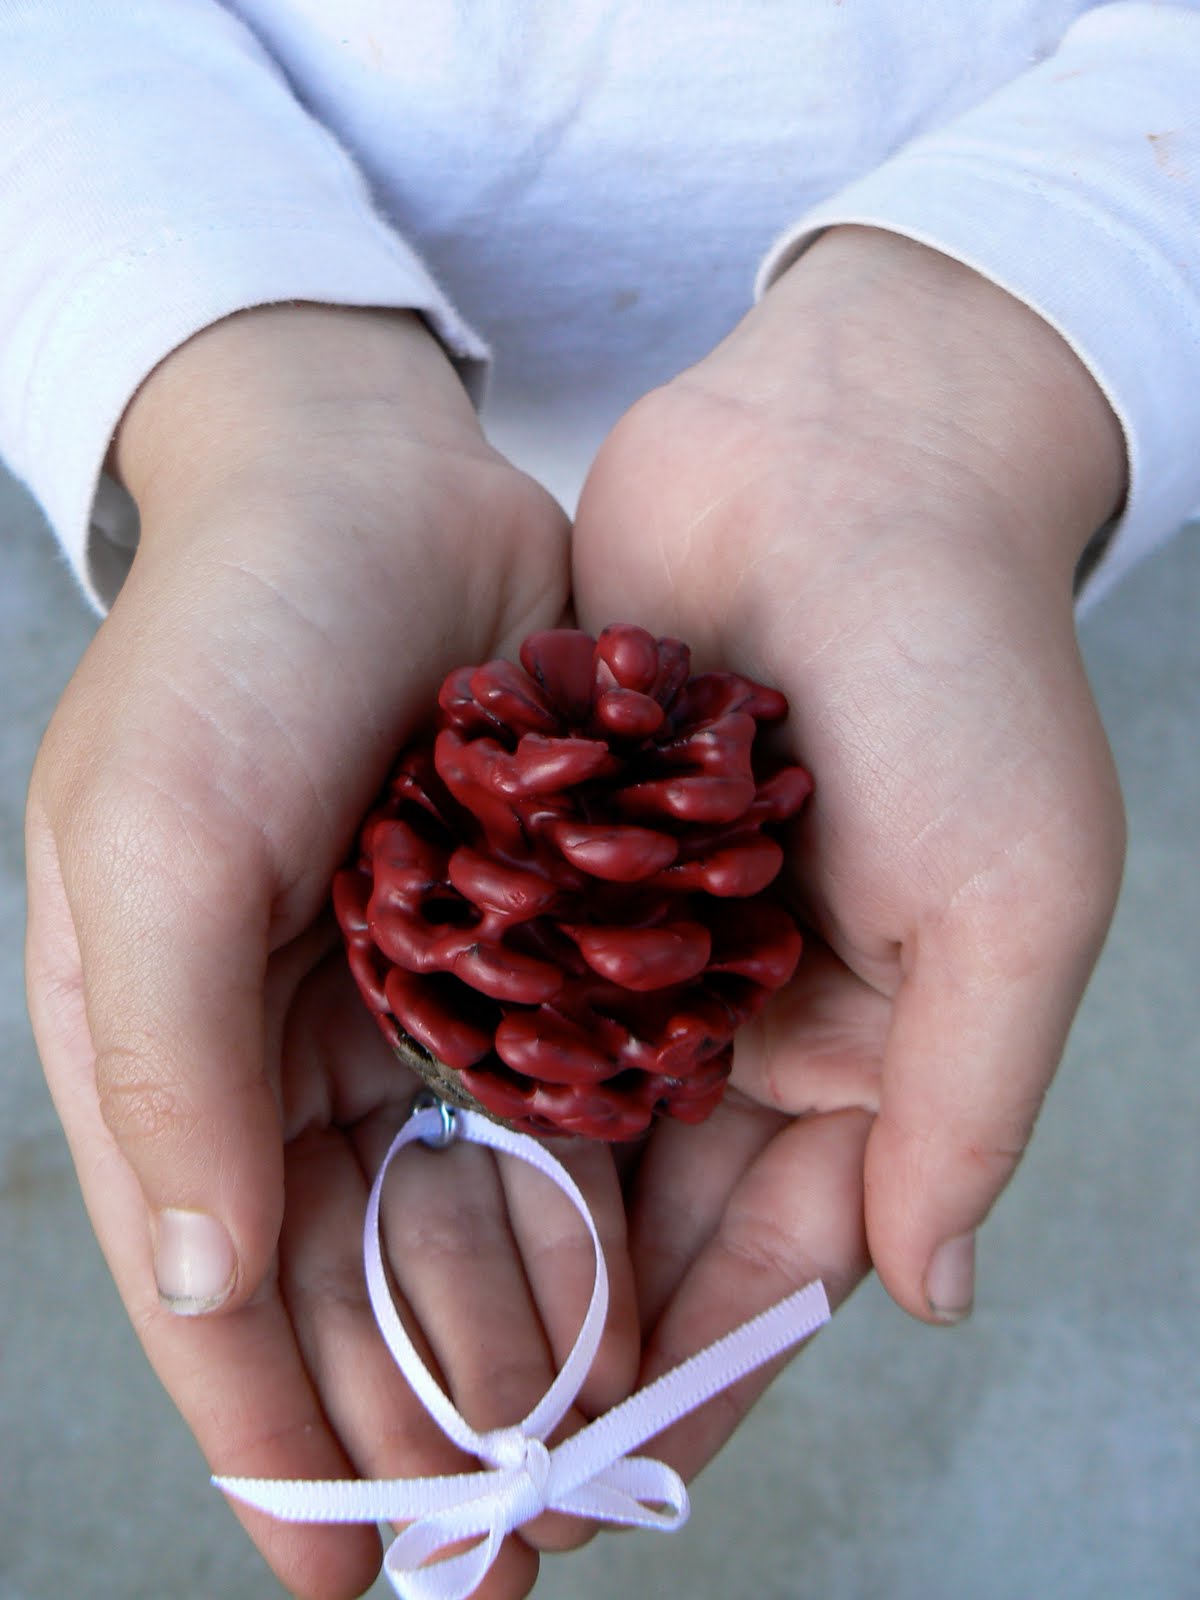

They have such a wonderfully smooth and waxy texture. Both of my children are totally fascinated by them and hold them lovingly. They smell them, rub them against their cheeks, stroke them. I do wonder if they will ever make it onto the tree?
Check out another fun wax Holiday decorating tutorial here and lovely nature-inspired Felted Acorn Christmas Tree Decorations here.
Blessings and magic for Christmas.


37 Responses
pure brilliance! i am so doing this!
Beautiful idea!
lisa
Oh, what a great activity for winter break. Thank you, thank you, thank you. I can not wait to try this with my kiddos.
Great idea- I was gonna decorate mine with glitter but this sounds much better. I hate the mess of that stuff.
Oh I love this! We used to do it with white wax and add a little glitter to the tips. So fun! And melted was smells so nice!
Any activity to do with broken crayons is great! I love scouting out the blogworld for ideas for christmas craft/gifts for family and friends.
those are so lovely, im gonna have to try this! thanks for the ideas.
What a wonderful idea. Writing this one down to do with my oldest.
Those are really beautiful–and to think, it’s simply crayon wax! Brilliant!
Really lovely! My group of girlfriends just decided to make ornaments for each other this year…this might have to be mine!
Ohhhh, I just love these. So pretty. I will be doing this very soon. :)
this is so adorable. can’t wait to try it!!!
Melting crayons looks like fun! This is a good idea. Thank you! Beth
Magic Onions, have you ever had any trouble with blogger? I’m having some trouble and can’t make my postings.
Be careful about placing them, though. As a Girl Scout, I learned to make these as firestarters, not ornaments, so they should be placed as far as possible from light strings.
I love these. Now I’ve got to start collecting broken crayons…
Beautiful…:)
Awesome project…always so creative!
Jamie :)
Oh these are just gorgeous and thanks for the tutorial. I am hosting a Christmas Fun Linky, I’d love to see these added to it as they are wonderful! Thanks. :)
Lovely decorations and they look a lot of fun to make too! :)
So clever!! They are wonderful!
Oh the possibilities!
Hi, have just stumbled across your blog after trawling the net for Christmas pine cones ideas. Love this idea LOADs! My own daughter Kitty has been collecting pine cones for months and now I FINALLY know what to do with them. I am visualising 3 or 4 of these bundled together as beautiful Christmas treats for the family. J’adore!
hi good day ! nice post you have . about this decoration they are beautiful . this add attraction to our home . it depends only on how you put it or the arrangement in order to fit it in your interiors and theme . like me i have some home and garden decors which i contrast with my garden accessories and garden spinner and they blend perfectly . lovely set up !
Another brilliant idea! Thanks, Anne H, for mentioning that these can be firestarters. I might be able to hook my 12 year old son into making them if he thinks of them as firestarters. He’s obviously waaaaayyy too oool to make Christmas ornaments!
I love this idea! They look so pretty. How do you ever get the wax out of the glass when you’re done, though?
I have made these before and added some cinnamon scented oil and they make the house smell yummy every year when I bring them out.
I really want to try these with my grandchildren. Thanks so much.
You are brilliant – I love this idea! (and I REALLY love how we can clean out all the crayon containers this weekend!)
Thanks!
We did this today! I didn’t have enough green crayons (even after adding some more yellow and blue) so we put in a old votive I had. It added a really nice scent! My wax was thin so they had to be dipped a couple times. Such a pretty result and the boy enjoyed it.
They look good enough to eat!
I blogged a pic of our finished project here:
http://mamaknj.blogspot.com/2010/12/linky-love-homemade-ornament-roundup.html
Thanks again!
Lovely – I can’t wait to try this. Glitter IS glorious! (They put it in my snowflakes pop up book, which made me very happy, indeed.)
Hi,
I came across this project and I really love it ~ I have included it in my roundup today – I hope you like it and are ok with it ;)
http://www.lifeologia.com/roundup-handmade-holiday/
Cheers.
Ella
Can i use a diff cup or does t have to be glass?
Hi Marci,
You can use any cup.
xo Donni