First off : Good news! The Tooth Fairy came in the night to collect Kitty’s molar. Phew… 5 nights late but better late than never, don’t you think?
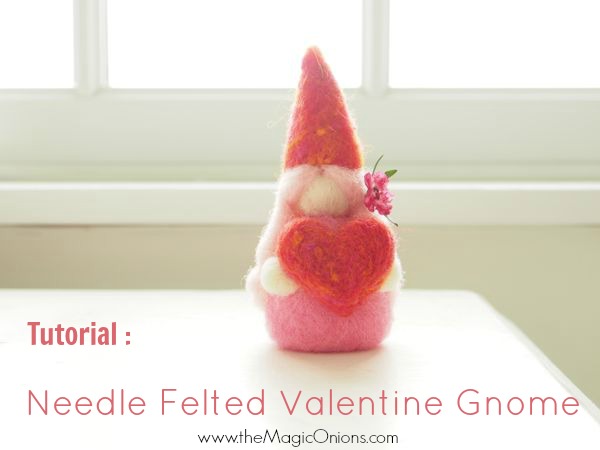
Now for the Needle Felted Gnome tutorial I promised you… isn’t she just the cutest?
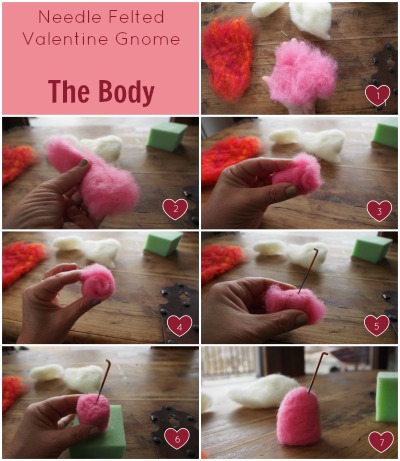
I’ve tried something a little different with this tutorial. As there are so many photos, I thought a photo collage would work best. I’ve broken it down into 3 parts : The Body, The Head and The Hair and Heart.
27 hours later…
The numbers in the collages correspond with the numbers of the instructions.
Needle Felted Valentine Gnome Tutorial :
To make this gnome, we’ll be using 2 shades of pink wool, red wool and white wool. Our tools are a needle felting needle and a foam board. I also picked a little Tea Tree flower for her hair (Tea Tree is in bloom in Southern California!)
1. The Body
We’ll be using the brighter of the two pink shades of wool.
1.) Break off a piece of fluffy pink wool about the size of your hand.
2.) Place it on the table and press it flat with the palm of your hand. Now roll it into a long sausage.
3.) Turn the sausage 90 degrees and, starting with the short end of the sausage, roll it into a tight spiral.
TIP : Rolling the wool like this first will make your needle felting nice and firm and cut down on the time it takes to needle felt it into the shape you want. This rolling process can be used for most projects.
4.) This photo shows you that my wool in rolled into a nice tight spiral.
5.) Place your spiral of wool on the foam board and needle felt all around the outside. This will ensure that your wool body keeps it’s shape.
6.) Choose the fattest end of the spiral and needle felt it flat. This will be the base of your gnome’s body.
7.) Turn the body the right way up and needle felt the neck part of your gnome’s body, rounding it nicely.
Voila! … your body is ready. Set it aside.
2. The Head
We will be using the white and red wool.
Let’s start by making a needle felted ball for the gnome’s head.
1.) Break off a piece of white wool about the length and half the width of your hand.
2.) Roll the wool between the palms of your hands as if you were rolling a piece of playdough into a snake. This firms up the wool and makes felting it easier.
3.) Roll the wool snake into a spiral.
4.) Set the spiral on the foam board and needle felt it along the outside. Fluff out the ends of the spiral and needle felt them together to cover the shape of the spiral. Keep needle felting the ball evenly until it becomes perfectly firm and round. This is your gnome’s head. If you need to see step by step photos of this process, visit this tutorial where I make little needle felted eggs.
5.) Now for the Gnomes hat. Break off a piece of wool about the length and half the thickness of your hand.
6.) Roll it in between the palms of your hands as you would roll a piece of palydough into a snake. This firms up the wool and makes it easier to work with. Roll the wool snake into a tight cone, making sure one end of the cone is thinner than the other end.
7.) Place the hat on the foam board and needle felt all around the outside… making sure to keep the cone shape ~ one end pointed and the other end flat. Work on getting a nice indent in the flat end of the cone as this is where your gnomes head will fit.
8.) Fit the gnome’s head into this indent and connect the two by needle felting the red hat wool into the head wool in a downward motion. Connect the red hat wool all around the covered half of the head.
9.) When the hat is well connected to the head, you’ll need to neaten up the shape of the hat by needle felting it where it has become bumpy.
10.) Now let’s connect the head to the gnome’s body. Place the head in place and needle felt the head-wool gently into the pink body-wool… all round the head.
11.) To fasten the head in place, needle felt the body-wool into the head-wool about a quarter of an inch below the head… all around the gnome’s body. You’ll need to neaten up the gnome’s body a little when you are done by needle felting it where it has become bumpy.
Voila! You have a gnome!

3. The Hair and Heart
Of course, you want to pretty your Valentine gnome up a little. She definitely needs hair and a heart.
We will use red wool for the heart, some white wool for her hands and the lighter shade of pink wool for her hair.
1.) Here is a step-by-step tutorial on how to make these sweet little needle felted hearts.
2.) When you have made a heart, place it on your gnome and connect it to your her by needle felting it where the red heart-wool connect to the pink body-wool.
3.) Now for hands that hold the heart. Break off a thin piece of white wool about the length of your needle.
4. ) Roll it in the palms of your hands as if you were rolling a piece of playdough into a snake. This makes the wool easier to work with. Roll the wool snake into a tight spiral.
5.) Place this little spiral of white wool in place on your gnome… one end on the gnome’s body, the other on the heart.
6.) Tuck the ends of the wool spiral into the crevice made by the body and heart and needle felt the ends into both the heart and the body until you have neat little gnome-hands holding the heart. Repeat for the other hand.
7.) She want’s pretty pink hair. Break your light pink wool into little tufts and roll the ends of the tufts into dreadlocks.
8.) Place the fluffy end of the pink tufts against the head and under the hat. Needle felt it into the head, along the hat line. Needle felt it along the length of the hair, into your gnome’s body.
9.) Keep adding layers all around her head until she has the perfect pink head of hair.
Voila!! Your valentine gnome is ready for LOVE!

Oh please, if you make one for yourself… please, please, please take a photo to show me… I’d LOVE to see how she turns out.
But here’s the best part… now that you can make a Valentine Gnome, you can make any kind of gnome! Had you thought of that? Want a boy? Make one with a red hat, a green body and short brown hair… he can be holding an acorn, a stick or a tiny pine cone. You can make a baby gnome, a grandmother gnome, a smaller gnome… a BIGGER gnome!! You can become a gnome lady just like me.
NOTE :
a.) For those of you who are now in love with needle felting and want to try other projects too, I have an assortment of needle felting kits in my shop here – Needle Felting Kits.
b.) For those of you who want other free needle felting tutorials, please visit my Needle Felting Page.
Happy crafting
Blessings and magic,
Donni


14 Responses
So stinkin’ cute! Looks like a great shape for beginners.
Thanks Amy :-)
Loved the tutorial! Thanks, so much. <3
I’m glad you enjoyed it. Your felting work is wonderful!!
Thanks, I wanted to post a photo of the gnomes I made…. But can’t figure out how ( on my IPad) but they are on my Facebook page ! Felt Song Fiber .. Check it out
Hi Donni – this was JUST what I was after – with limited time and a four yearlong who is just getting interested in festivals!
Amazing tutorial – so clear and precise :)
Can I ask which app you use for the collage with the photos? Looks amazing – I don’t make tutorials but I wanted to make photos of my products being used in different ways… would be perfect!
I’ll post a photo of mine when I get it done!
Thanks again :)
f x
Hi Freyja,
I use Picmonkey ( http://www.picmonkey.com/ ) … It’s such a fabulous site and super easy to use once you’ve played around with it a little.
Gosh… I love your beeswax wraps!!!
Love Donni
Loved the felting directions!
Thanks Freda.
She’ so precious she makes me want to get out my felting needles again. Thanks for a great tutorial.
Ooo, you must… there is something just waiting to be made :-)
Thank you for the tutorial! Finished a little late, but it doesn’t matter. I have no idea how to share the picture.
Hi Julie… well done!! It’s never too late for a darling little gnome :-)
I’d LOVE to see her!! You can send a photo if you have one to donni(at)theMagicOnions(dot)com.
Ooo, yay!!
Blessings and magic,
Donni
Thank you so much for sharing your DIY felting projects. I will for sure try some of the hearts and owls before Christmas!. :)